<Only for model with
wireless LAN, Bluetooth, and/or wireless WAN>
There are several ways of disabling and enabling wireless
communication.
NOTE
- For further information
about Wireless WAN: (  Wireless WAN Wireless WAN)
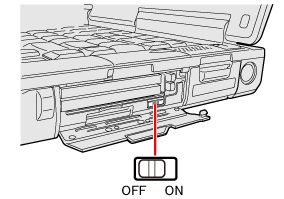
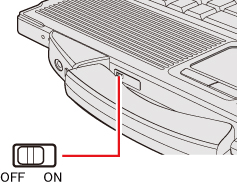
The
Wireless Switch
To disable all wireless
communication
To enable wireless communication
- Switch to ON.
- In the default setting, the wireless switch
enables all wireless devices when it is set to ON.
<CF-53 Series>
<CF-52 Series>
To
check the wireless communication status
- Click
 on
the notification area and place the
cursor over the Wireless Switch Utility icon ( on
the notification area and place the
cursor over the Wireless Switch Utility icon (  or
or  ).
).
A tooltip appears.
NOTE
- The Wireless Switch
Utility icons ( and
) indicate the on/off status of wireless communication, not the
IEEE802.11a setting. - If the setting is changed
in [Device Manager], the display will be changed accordingly. - If you uninstall the
Wireless Switch Utility, set the wireless switch to ON beforehand. - Do not turn on/off the
switch repeatedly at too short intervals. - Do not restart, log off,
or enter sleep*1 or hibernation immediately
after turning on/off the switch. - Do not turn on/off the
switch while Windows is starting up. - To use wireless
communication, set the wireless devices ([Wireless LAN] / [Bluetooth] /
[Wireless WAN]) to [Enabled] (default) in the [Advanced] menu of the
Setup Utility ( Wireless
Configuration). - When you set [Wireless
Switch] to [Disabled] in the [Advanced] menu of the Setup
Utility,
the
Wireless Switch Utility icon will not appear if you click
on the notification area. All wireless equipment (wireless LAN,
Bluetooth, wireless WAN) will remain ready irrespective of the wireless
switch setting. - It may take some time to
turn off wireless communication after switching the wireless switch off. - If the setting is changed in [Device Manager],
the
display
will be changed accordingly. - You can check the wireless
LAN communication status in Intel ®
PROSet/Wireless Software. Perform the following procedure.
- Click
 (Start) - [All Programs] - [Intel PROSet Wireless] - [WiFi Advanced
Statistics].
(Start) - [All Programs] - [Intel PROSet Wireless] - [WiFi Advanced
Statistics].
- <Only for model
with Intel ® Centrino ®
Advanced N-6205>
Perform either of the
following procedures to check the status in Intel ®
PROSet/Wireless Software.
- Double-click
 , ,  or
or  on the notification area.
- Click [start] - [All Programs] - [Intel PROSet
Wireless] - [WiFi Connection Utility].
*1 : Windows XP: standby
Wireless
Switch Utility
This utility allows you to control the function of the wireless switch.
This utility also allows you to enable or disable wireless devices from
a pop-up menu. In the default setting, all wireless devices are
enabled.
The Wireless Switch Utility icon
To enable or disable particular
wireless devices
- Click the Wireless Switch Utility icon to show the
pop-up menu.
- Select ON or OFF for the device you want to enable or
disable.
To change the function of the
wireless switch
In the default setting, the wireless switch enables devices that you
select turning the wireless switch off last time. You can change this
function.
- [Selects the device for which to turn the device
status on each time with the dialog box.]
Display a dialog each
time you set the wireless switch to ON so you can choose which wireless
device to enable.
- [Turns on the following device.]
Only selected devices
are enabled when you set the wireless switch to ON.
- [Turns on the device that was on immediately before
the wireless switch was turned off the last time.] (default)
When you turn on the
wireless switch, the on/off settings that were selected when you last
turned off the wireless switch will be restored.
- Click
on the notification area and click the Wireless Switch Utility icon
(
or
).
- Click [Settings].
- Select the setting you want to assign to the wireless
switch.
- Click [OK].
Wireless
Connection Disable Utility
You can automatically disable the wireless LAN/wireless WAN connection
when a LAN cable is connected to your computer. You need to install the
Wireless Connection Disable Utility to use this function.
Installing the utility
- Log on to Windows as an administrator.
-
Click
(Start), input
"c:\util\wdisable\setup.exe" in [Search programs
and files], and press «Enter».
Click [start] - [Run] and input
"c:\util\wdisable\setup.exe", and click [OK].
- Follow the on-screen instructions to install the
Wireless Connection Disable Utility.
Checking the status of the
wireless connection
NOTE
- The Wireless Switch
Utility should also be installed so that the Wireless Connection
Disable Utility works. The Wireless Switch Utility has already been
installed at the factory.
- To use the utility, set
[Wireless
Switch] to [Enabled] in the [Advanced] menu of the Setup
Utility. - The utility does not
automatically disable the Bluetooth connection.
Status indication
After installation, the Wireless Connection Disable Utility is
automatically started after a user is logged in. An icon appears when
click on
the notification area.

: Indicates that
- the utility is enabled, and
- the wireless connection is disabled since a LAN cable
is connected.

: Indicates that
- the utility is enabled, and
- the wireless connection is enabled since no LAN cable
is connected.

: Indicates one of the following statuses;
- the utility does not monitor the LAN port status,
- the Wireless Switch Utility has not been started, or
- LAN is disabled in the [Advanced] menu of the Setup
Utility or in the device manager.
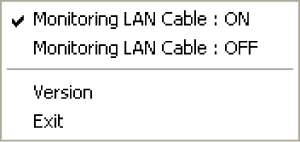
Menu
Right-clicking the utility icon opens a menu as follows.
Clicking the menu item causes the following utility action.
- Monitoring LAN Cable: ON
Enables the Wireless
Connection Disable Utility to monitor the LAN port and disable wireless
connection when a LAN cable is connected.
- Monitoring LAN Cable: OFF
Disables the Wireless
Connection Disable Utility, and enables wireless connection regardless
of whether a LAN cable is connected or not.
- Exit
Exits the Wireless
Connection Disable Utility and enables wireless connection.
|


 ,
,
 ,
,
 ,
,
 ,
or
,
or  on the notification area, and click [Open Atheros Client Utility].
 : Indicates that the wireless devices have
been disabled in the Setup Utility.
: Indicates that the wireless devices have
been disabled in the Setup Utility.