<Only for model with
wireless LAN>
CAUTION
- Do not use wireless LAN on
airplanes, in hospitals, or in other locations where wireless LAN
signals may affect devices.
Follow the instructions of
airline companies and hospitals. If you use the computer in these
locations, turn off the wireless LAN.
- To avoid unauthorized
access to the computer through wireless LAN
We recommend you to make
security settings such as encryption before using wireless LAN.
Otherwise the hard disk data such as the shared files can be exposed to
the risk of unauthorized access.
NOTE
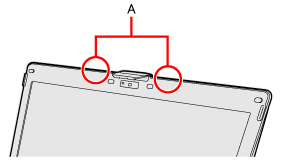
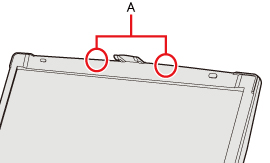
- Communication is
established through the wireless LAN antenna (A). Do not block the
antenna area with your hand or body.
<CF-53 Series>
<CF-52 Series>
- When you connect this
computer to a port
replicator compatible with external antenna, you can switch the
internal antenna to the external antenna, or vice versa.
(  Wireless Antenna
Switching Wireless Antenna
Switching) - You cannot use the
wireless LAN function together with the Fast User Switching function.
- The transmission rate will
be lower when a microwave oven is used near by.
- To use wireless LAN, set
[Wireless LAN]
to [Enabled] (default) in the [Advanced] menu of the
Setup Utility. - It may take some time to
turn off wireless LAN after switching the wireless switch to off.
Using
the Wireless LAN Function
Before using a wireless LAN, turn the wireless LAN communication on.
Turning
on/off the wireless LAN
communication
Setting
the wireless LAN access
point 
Preparation
Follow the instruction manual of the wireless LAN access point to make
settings for the access point to recognize the computer.
- Turn the wireless LAN on.
- Click
 or
or  on the notification area.
- Select an access point, and click [Connect].
- Input the key you set for the access point to
recognize the computer, and click [OK].
Wait for the computer to
connect to the wireless LAN access point.
When the icon on the notification area is changed to  ,
the wireless LAN setting is complete.
- Click [Close].
NOTE
- The settings depend on the
network environment. For further information, ask the system
administrator or the person in charge of the network.
- If you use the stealth
type wireless LAN access point which restricts automatic detection of
the wireless LAN access point, take the following procedure.
If you do not perform the procedure below, you may not be able to
access the wireless LAN access point automatically or the wireless LAN
access point may not be displayed on the [Connect to a network] screen.
- Click
 ,
or
on the notification area, click [Open
Network and Sharing Center] - [Set up a connection or network] -
[Manually connect to a wireless network] and click [Next]. ,
or
on the notification area, click [Open
Network and Sharing Center] - [Set up a connection or network] -
[Manually connect to a wireless network] and click [Next].
- Input necessary information and add check marks for
[Start this connection automatically] and [Connect even if the network
is not broadcasting] and click [Next].
Setting the profiles 
<For model
with Intel® Centrino®
Advanced N-6205>
- Double-click
 /
/  /
/  on the notification area.
The [Intel®
PROSet/Wireless WiFi Connection Utility] screen appears.
- When
or
is displayed, skip step 2.
- When you double-clicked
in step 1, slide the wireless switch to turn on.
- Click [Profiles] and click [Add].
- Enter the profile name and WiFi Network Name (SSID),
and make other necessary changes, then click [Next].
- Make necessary settings and click [OK].
- Select the profile you set and click [Connect].
- Click [Close].
<For model
with Atheros AR928X>
- Right-click
 /
/  /
/  / / /
/  on the notification area, and click [Open Atheros Client Utility].
The [Atheros Client
Utility] screen appears.
- When ,
,
or
is displayed, skip step 2.
- When you right-clicked
in step 1, slide the wireless switch to turn on.
- Click [Profile Management], and click [New].
- Enter the profile name and wireless network name
(SSID), and make other necessary changes, then click [OK].
- Select the profile you set and click [Activate].
- Click
 .
.
NOTE
- You need to set the
profile for each user.
- The settings depend on the
network environment. For further information, ask the system
administrator or the person in charge of the network.
- <Only for
model
with Intel® Centrino®
Advanced N-6205>
For further information of
Intel® PROSet/Wireless software, refer
to [Help] in the menu bar.
- <Only for
model
Atheros AR928X>
For further information of Atheros, click [Help] - [Atheros Client
Utility Help] in the menu bar.
<Only for
model with Intel®
Centrino® Advanced N-6205>
Enabling/Disabling
the Wireless LAN Standard IEEE802.11a (802.11a)
- Click
 on the notification area and click
  or
or  . .
- Click [802.11a Enabled] or [802.11a Disabled].
NOTE
- In some countries,
communication using IEEE802.11a (5 GHz wireless LAN) standard is
restricted by law.
- The Wireless Switch
Utility icon ( or
) indicates the on/off status of wireless LAN and/or Bluetooth and/or
wireless WAN, not the setting of IEEE802.11a. - If IEEE802.11a is enabled
or disabled while the computer is connected to an IEEE802.11b/g access
point, the connection will be temporarily interrupted.
-
You can also change the
IEEE802.11a setting in [Device Manager].
-
Click
 (Start) - [Computer] - [System properties] -
[Device Manager].
(Start) - [Computer] - [System properties] -
[Device Manager].
- A standard user needs to enter an administrator
password.
Click [start] - [Control Panel] - [Performance and Maintenance] -
[System] - [Hardware] - [Device Manager].
- Double-click [Network adapters] and double-click
[Centrino(R) Advanced-N 6205 AGN].
- Click [Advanced], and then select [Wireless Mode] in
[Property].
- Select the settings in [Value].
- Click [OK].
If you enable or disable
802.11a using the pop-up menu of Wireless Switch Utility, the setting
in [Device Manager] will be accordingly changed as below.
| Settings
in Device Manager |
Settings
in Wireless Switch Utility |
|
|
|
When 802.11a is
enabled |
When 802.11a is
disabled |
[6. 802.11a/b/g]
[4. 802.11b/g] |
[802.11a, 802.11b and 802.11g]
[802.11b and 802.11g] |
a+b+g+n is enabled |
b+g+n is enabled |
[3. 802.11g]
[5. 802.11a/g] |
[802.11g only]
[802.11a and 802.11g] |
a+g+n is enabled |
g+n is enabled |
[1. 802.11a]
[2. 802.11b] |
[802.11a only]
[802.11b only] |
a+n is enabled |
b is enabled |
|