|
<Only for model with Camera>
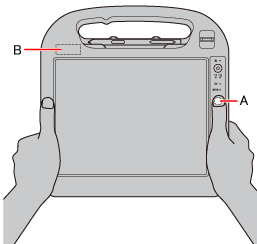
- Hold the side of the computer to aim the camera.
- Press the application button «A1» (A) to activate the camera.
Preview window is displayed.
- The camera lens (B) is located at the rear.
- Press the application button «A1» (A) to take a picture.
A picture is displayed in the window.
- Save the picture
- Click [Save] and specify the destination to save and file name, then click [OK].
- Copy the picture to clipboard
- Click [Copy to Clipboard].
- Delete the picture
- Click [Delete], and then click [Yes].
- Click [Close] to close the picture window.
Installing Camera Utility
The Camera is ready to use without any other settings at the time of purchase.
You can use the Camera Utility that allows you to change the settings for taking picture and record video.
To use the Camera Utility, first install it.
- Log on to Windows as an administrator.
- Click
 (Start) and input [c:\util\pcam\setup.exe] in [Search programs and files], and press «Enter». (Start) and input [c:\util\pcam\setup.exe] in [Search programs and files], and press «Enter».
Follow the on-screen instructions.
- Click (Start) and input [c:\util\lightsw\setup.exe] in [Search programs and files], and press «Enter».
Follow the on-screen instructions.
Starting up Camera Utility
Start up the Camera Utility to take pictures and videos.
- Click (Start) - [All Programs] - [Panasonic] - [Camera Utility].
NOTE
- If you use this utility and other multi-media software at the same time, an error may occur.
Close all multi-media software including this utility and restart this utility.
- If an error message appears and nothing is displayed, restart this utility.
- When the computer has resumed from sleep and hibernation, an error may appear and the connection with the camera device may be lost.
If this occurs, restart this utility.
Taking Pictures
Taking Pictures
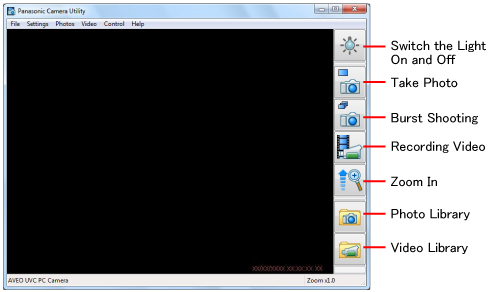
Switch the Light On and Off
To switch the light on and off.
-
Click
 or click [Control] - [Camera Light], then click [ON] or [OFF]. or click [Control] - [Camera Light], then click [ON] or [OFF].
- When the camera light is on, the icon changes to
 . .
- You can assign the Light function to an application button. (
 Assigning the Light/Zoom In/Take Photo Functions to an Application Button) Assigning the Light/Zoom In/Take Photo Functions to an Application Button)
- The light turns off automatically after a certain period of time.
Click [Control] - [Camera Light] - [Settings...] to set your lighting duration preferences.
- To maximize battery and LED life, it is not recommended to keep the light on for a long period of time.
Zoom In
To enlarge or reduce the camera image.
-
Click
 or click [Control] - [Zoom] and select [x 1.0], [x 1.5], [x 2.0], [x 2.5], or [x 3.0]. or click [Control] - [Zoom] and select [x 1.0], [x 1.5], [x 2.0], [x 2.5], or [x 3.0].
Mirroring
You can change mirroring in the camera.
- Click [Control] - [Mirror] - [ON] or [OFF].
Button Layout
To change the button layout.
- Click [Control] - [Button Layout], then click [Top-down] or [Bottom-up].
Display Aspect Ratio
To change the display size of preview.
- Click [Control] - [Display Aspect Ratio], then click [Stream Size] or [Window Size].
Take Photo
You can record the camera image as a picture.
-
Adjust the direction of camera, zoom ( above), picture quality ( Changing the Settings for Taking Pictures), etc.
- Click
 or click [Photos] - [Take photo]. or click [Photos] - [Take photo].
NOTE
- You can view pictures by clicking  or through Windows Explorer (default location is my pictures folder). - When the distance between the camera and subject is too close, the image may be out of focus.
- When you take photos while the light is on, the light-up duration is reset to the time setting for the “Auto Off Setting” ( Switch the Light On and Off).
Burst Shooting
You can take pictures in fixed intervals.
-
Click
 or click [Photos] - [Start Burst Shooting]. or click [Photos] - [Start Burst Shooting].
-
During Burst shooting, the icon changes to
 . .
-
Click or click [Photos] - [Stop Burst Shooting].
NOTE
- During Burst shooting, naming, saving or canceling photos is not available.
The default name for saving photos is the date and time the picture was taken.
- When pictures are taken in the Burst shooting mode, the displayed still pictures may differ from pictures actually taken.
Changing the Settings for Taking Pictures
-
Click [Photos] - [Settings...].
-
Change to preferred settings and click [OK].
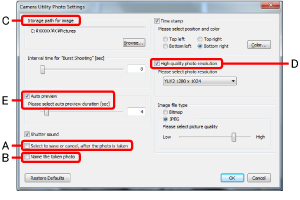
- When the following boxes are checked,
- Box (A) only: Select to save or cancel, after the photo is taken
Save ( ) and delete icons ( ) and delete icons ( ) will appear after the photo is taken.
Photo will be saved using default name (date/time). ) will appear after the photo is taken.
Photo will be saved using default name (date/time).
- Box (B) only: Name the taken photo
Photo can be named (and saved) using the windows File Name box that appears after photo is taken.
Photo can be deleted by selecting “cancel”
- Boxes (A) and (B): Select to save or cancel, after the photo is taken & named
Save () and delete icons () will appear after the photo is taken.
Photo can be named after save icon () is selected using the windows File Name box.
NOTE
- At (C), if you specify an externally connected storage device as the save destination, the camera software may operate slowly.
In this case, specify the hard disk as the save destination.
- High-quality pictures can be obtained by checking (D). Also, regardless of the display screen size, you can take pictures with the selected resolution.
- When (E) is not checked, the still picture displayed after pressing the icon (  ) for saving photos after shooting may differ from the picture actually taken.
Recording Video
Recording Video
-
Click
 or click [Video] - [Start Recording]. or click [Video] - [Start Recording].
-
While recording, the icon changes to
 . .
-
Click or click [Video] - [Stop Recording].
NOTE
- You cannot zoom or display the date/time stamp while recording.
- When the distance between the camera and subject is too close, the image may be out of focus.
- If you specify an externally connected storage device as the save destination, the camera software may operate slowly.
In this case, specify the hard disk as the save destination.
- If you rotate the display, pictures may not be displayed correctly.
Do not rotate the display while recording.
Movies cannot be recorded unless the display is set to primary landscape.
Be sure to return the display to primary landscape before recording movies.
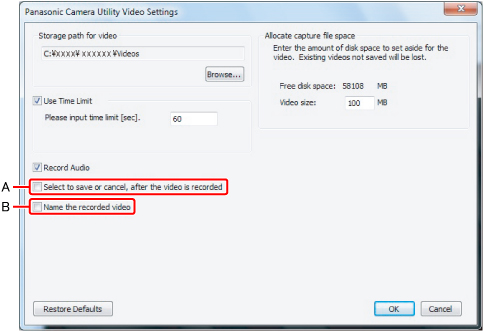
Changing the Settings for Recording Video
-
Click [Video] - [Settings...].
-
Change to preferred settings and click [OK].
- When the following boxes are checked,
- Box (A) only: Select to save or cancel, after the video is recorded
Save ( ) and delete icons ( ) and delete icons ( ) will appear after the video is taken.
Video will be saved using default name (date/time). ) will appear after the video is taken.
Video will be saved using default name (date/time).
- Box (B) only: Name the recorded video
Video can be named (and saved) using the windows File Name box that appears after stopping the video.
Video can be deleted by selecting “cancel”.
- Boxes (A) and (B): Select to save or cancel, after the video is recorded & Name the recorded video
Save () and delete icons () will appear after the video is taken.
Video can be named after save icon () is selected using the windows File Name box.
NOTE
- If a size of temporary file to save recorded video becomes big., it will take some time to start recording video.
Settings
Setting Image Quality
Set your image quality preferences on the [Image Control...] screen.
- Click [Settings] - [Image Control...].
NOTE
- The image of the camera might flicker when taking a picture under the fluorescent lamp.
Change the setting of the anti flicker according to the following procedure.
-
Click [Settings] - [Image Control...].
- Change the setting of [PowerLine Frequency (Anti Flicker)].
(Set it to the power-supply frequency in the region).
- Click [OK].
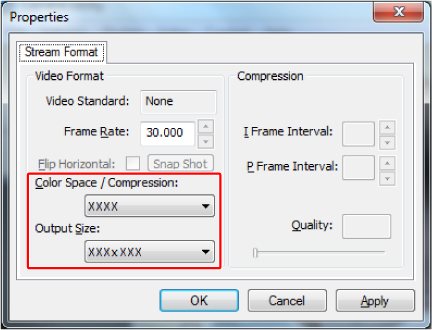
Setting the Compressed Data Format/Resolution for the Image
-
Click [Settings] - [Video Format...].
-
[Color Space / Compression]
Set the compressed data format for the image.
-
[Output Size]
Set the image resolution.
NOTE
- Make sure the image resolution is within the range of the display resolution of this computer ( OPERATING INSTRUCTIONS “Specifications - Display Method”). - If you set [Output Size], the [Frame Rate] is automatically determined.
- The setting items depend on the device, some items cannot be selected.
- When [High quality photo resolution] in [Camera Utility Photo Settings] is not selected, resolution of the photo to be saved is determined by the setting configured for [Output Size].
- Resolution of the movie to be saved is determined by the setting configured for [Output Size].
- Previewed images and movies will be displayed according the Camera Utility window size, regardless of [Output Size] settings.
Assigning the Light/Zoom In/Take Photo Functions to an Application Button
You can assign the Light/Zoom In/Take Photo functions to the application buttons. (A)

-
Start up Application Button Setting Utility.
Click
(Start) - [All Programs] - [Panasonic] - [Application Button Setting].
-
For the application button you want to assign the Light/ Zoom In or Take Photo function, select [Launch an Application] and input the following.
NOTE
- You cannot assign the Light/Zoom In/Take Photo functions to the buttons to which Camera, RFID Reader, or Barcode Reader function is already assigned.
«A1» : Camera
«A2» : RFID
«A3» : BCR
<When assigning the Light function> ( Switch the Light On and Off)
In the [Program location:] box
c:\program files *1\panasonic\lightsw\lightsw.exe
<When assigning the Zoom In function> ( Zoom In)
In the [Program location:] box
c:\program files *1\panasonic\pcam\pcam.exe
In the [Program parameter:] box
/zoom_in
<When assigning the Take Photo function> ( Take Photo)
In the [Program location:] box
c:\program files *1\panasonic\pcam\pcam.exe
In the [Program parameter:] box
/shutter
*1 : (64-bit) :Program Files (x86)
- Click [OK].
NOTE
- When the Camera Utility is not running, and if you press the buttons to which these functions are assigned, the Camera Utility is activated.
- If you operate the Utility after assigning the “Take Photo” function, the same operation will be performed as the one when the check marks both for [Select to save or cancel, after the photo is taken] and [Name the taken photo] are not added ( Changing the Settings for Taking Pictures). - If you operate the Utility after assigning the “Take Photo” function by specifying the file name, the same operation will be performed as the one when the check mark for [Select to save or cancel, after the photo is taken] is added and check mark for [Name the taken photo] is not added ( Changing the Settings for Taking Pictures).
- When you assign “Take photo function”or “Take photo function by specifying the file name”to the application buttons, perform the following settings in MCA Configuration Editor.
- Click [MCA Application] - [Default Handler Configuration] - [Global Settings] - [Camera].
- Input “c:\Program Files\Panasonic\PCam\PCam.exe” in [Camera Default Handler].
- Input “/shutter” or “/shutter_name” in [CA-LaunchAppCmdLine].
- Change [CA-SupportsConcurrentInstances] to [True].
- Click [OK].
|