- When the battery is repeatedly charged
- When the battery is used, charged or stored in a place with high temperature
Battery Power |
||||||||||||||||||||||||||||||||||||||||||||||||||||
Important Battery TipsHow to use the battery with minimal deteriorationThe battery is a consumable and, as such, its performance will gradually deteriorate.
This deterioration is accelerated under the following conditions.
To minimize deterioration of the battery and ensure a longer battery life, you must reduce the number of charges and ensure that the temperature inside the battery does not become too high.
Bear in mind the following points.
Charge the battery in a temperature range of 10ºC to 30ºC {50ºF to 86ºF}In places where the outside air temperature is high, the temperature inside the battery will also become high.
Do not charge the battery inside a vehicle with all its windows closed and exposed to the hot sun or in other places where the temperature is high.
This computer’s battery will not be charged if its temperature is outside the allowable range. (At such a time, the battery indicator blinks orange.) We recommend charging the battery no more than once per dayRecharging the battery after every small use raises the total number of battery charges and speeds battery deterioration.
To lower the total number of battery charges, we recommend recharging the battery no more than once per day or when the remaining charge drops to 10% or less. With this computer, in order to reduce the number of charges, the battery will not be recharged immediately after it has been fully charged unless the remaining charge has fallen to less than 95%. Charging the battery while the computer is powered off is recommendedIf the computer’s power is on, the temperature inside the battery rises due to the effects of heat from the CPU and other components.
We recommend that you only charge the battery when the computer is powered off.
Use the battery in the high temperature modeHigh temperature mode is a function that prevents deterioration of the battery in high temperature environments or when using the fully charged battery pack for a long period of time.
When the high temperature mode is selected, the battery capacity is reduced, and therefore the battery operating time is shorter. We recommend the high temperature mode setting when the computer is to be used under the following conditions:
How to use the computer to maximize the battery operation timeLeave the computer off when it is not in useDecrease the internal LCD brightness using Panasonic DashboardThe power consumption is reduced by decreasing the brightness.
Before stepping away from your computer, enter the sleep or hibernation modePressing these key combinations will put your computer in the sleep or hibernation mode, thereby lowering the power consumption.
Click
|
||||||||||||||||||||||||||||||||||||||||||||||||||||
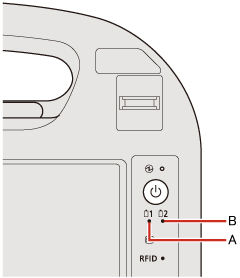
| Battery indicator | Battery status |
| Not lit | The battery pack is not inserted or not being charged. You can check presence of the battery pack by using Panasonic Dashboard. |
| Orange | Charging is in progress. |
| Green | The battery is fully-charged. |
| Blinking green |
When you close the battery cover with the battery pack already inserted: You can check the battery level by blinking times. Blinking times Battery Level 5 times 95 % to 100 % 4 times 50 % to 94% 3 times 25 % to 49% 2 times 5 % to 24% 1 time to 0 % to 4 % Except for the operations stated above: In High temperature mode, the battery pack is discharging the power to 80%*1 of the normal temperature mode. Do not remove the battery pack since the power is not supplied even if you connect the AC adaptor in this status. If remove the battery pack, the computer will be turned off and lose data. |
| Red | The remaining battery is approximately 9% or less. |
| Blinking red | When blinking approx. every 1 second: The battery pack or the charging circuit is not operating properly. When blinking approx. every 4 second: The battery cover is open. You can remove the battery pack in this case. When blinking approx. every 0.5 second: The battery cover is open. If you remove the battery pack in this case, the power supply is cut off and the computer is shut down. Close the battery cover immediately. |
| Blinking orange | The battery cannot be charged temporarily due to
the following reasons:
|
| Blinking green and orange alternately | The temperature is low and the computer is warming up to prevent the hard disk drive or flash memory from malfunctioning. The computer will start automatically after warming-up. |
*1 : In high temperature mode, the 100% battery level is equivalent to 80% level of the normal temperature mode.
NOTE
- Once the battery is fully charged, the computer performs recharging only when the battery level becomes less than approximately 95%, so overcharging is avoided.
Checking the Remaining Battery Charge
You can check the remaining battery charge on the screen.
(After logging on to Windows)
- Start up Panasonic Dashboard.
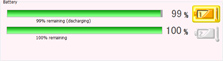
- When the battery pack is inserted (example)
In charging Normal temperature mode High temperature mode 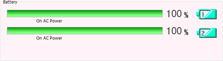
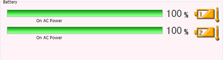
In discharging (The battery pack in the frame is discharging) Normal temperature mode High temperature mode 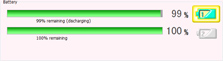
- When the battery pack is not inserted
Normal temperature mode High temperature mode 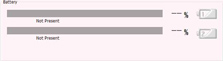
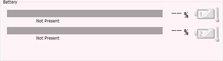
- When the battery pack is inserted (example)
NOTE
- The battery display may not correspond to the actual remaining battery charge in the cases as below.
To correct the display, perform the Battery Recalibration ( Correcting the Battery Display (Battery Recalibration)).
- The battery indicator remains red.
- The indicator lights orange and the display shows 99% for a long time.
- Low battery warning appears soon after a short time of use.
This can occur when the computer is in sleep for a long time without power supply from the AC adaptor.
- The battery display may not be the same as that of  or
or  notification area.
This is not a malfunction.
notification area.
This is not a malfunction.
High temperature mode
The high temperature mode can prevent the battery from deteriorating when the computer is used in high-temperature environment or used for a long time with its battery fully charged.
Select [Auto] (default) or [High Temperature] in [Environment] of the [Main] menu of the Setup Utility. In [Auto] mode, high temperature mode or normal temperature mode is selected automatically depending on the battery status (the internal temperature of the battery pack, etc.) or usage condition (when the AC adaptor has been connected for a long period of time).
Select [Auto] (default) or [High Temperature] in [Environment] of the [Main] menu of the Setup Utility. In [Auto] mode, high temperature mode or normal temperature mode is selected automatically depending on the battery status (the internal temperature of the battery pack, etc.) or usage condition (when the AC adaptor has been connected for a long period of time).
NOTE
- Note that a level corresponding to a 100% charge for high temperature mode is approximately equivalent to an 80% charge level for normal temperature mode.
- After switching from [Normal Temperature] to [High Temperature] or vice versa, the remaining battery capacity will not be displayed correctly until the battery pack is completely discharged or fully charged.
- In the [Auto] mode:
Once the computer has automatically switched from the normal temperature mode to the high temperature mode, the computer will not switch back to the normal temperature mode until the battery has been used and recharged to a total charge level of about 5 times as much as that of the fully-charged state. This is to avoid battery deterioration.
In [Auto] mode, mode switching is possible only for the battery pack in operation. The other battery's [Environment] mode remains the same.
Computer behavior with low battery
The default settings are as follows.
This computer automatically switches from Battery 1 to Battery 2 and vice versa when either remaining battery charge becomes less than 10%. When both batteries are not sufficiently charged, the computer operates as below.
This computer automatically switches from Battery 1 to Battery 2 and vice versa when either remaining battery charge becomes less than 10%. When both batteries are not sufficiently charged, the computer operates as below.
| When the battery level becomes 10% [Low battery level] |
When the battery level becomes 5% [Critical battery level] |
|
|
| ↓ | ↓ |
| Charge the battery. | Connect the AC adaptor or replace the battery to start up the computer. |
|
|
Changing the Battery Charging Speed
The battery may become hot while being charged.
You can make the battery charging speed slower to keep the battery cooler during charge.
- Click
 on the notification area and click
  .
. - At [Battery Charge Speed], select [Slow] to make the battery charging speed slower.
To return to the normal charging speed, select [Standard].
- Click [OK].
Correcting the Battery Display (Battery Recalibration)
The “Battery Recalibration” function measures and memorizes the battery capacity.
To correct the battery display, use this function to fill the battery and then discharge it completely.
Perform the procedure at least once immediately after purchasing the computer.
Normally the interval of battery recalibration is 3 months.
The battery display may not be correct when the battery pack deteriorates after a long time use.
In this case, perform the procedure again.
- Connect the AC adaptor.
- Perform “Battery Recalibration”.
<To perform "Battery Recalibration" without shutting down Windows>
You can operate your computer while the battery recalibration is in progress.- Click
 (Start) - [All Programs] - [Panasonic] - [Battery] - [Battery Recalibration].
 - Select the battery pack on which to perform Battery Recalibration, and select [Perform Battery Recalibration while Windows operations are running.].
- Click [Start].
- To set the computer's status after the battery recalibration is completed, add a check mark to [After discharging is complete, place the computer in shutdown/sleep/hibernation mode for Windows.], and select in which mode the computer enters, [Shutdown], [Sleep], or [Hibernate].
- If you have set the computer's status at step 4, when the battery recalibration is completed, select [Shut down Now], [Enter sleep mode Now], [Enter hibernation mode Now] or [Cancel].
If you have not set the computer's status at step 4, click [Exit] to quit the battery recalibration.
The battery recalibration starts.
After the battery pack is fully charged, discharging starts.<To perform "Battery Recalibration" after shutting down Windows>
The computer restarts automatically and the battery recalibration is performed without starting Windows.- Close all the applications.
- Click (Start) - [All Programs] - [Panasonic] - [Battery] - [Battery Recalibration].
- Select the battery pack on which to perform Battery Recalibration, and select [Perform Battery Recalibration after shutting down Windows.].
- Click [Start].
- At the confirmation screen, click [Yes].
The battery recalibration starts.
After the battery pack is fully charged, discharging starts. When the discharging is completed, the power goes off automatically.After the battery recalibration is finished, normal charging starts.NOTE- The temperature range should be 10ºC to 30ºC {50ºF to 86ºF}.- When performing the battery recalibration without shutting down Windows, the battery recalibration ends and will not be completed if the AC adaptor is removed, or if the computer enters sleep and hibernation mode during recalibration.- Frequent recalibration of the battery can degrade the battery. A caution message appears when the battery recalibration is performed at the shorter interval than approximately a month. In this case, cancel the battery recalibration.- The battery recalibration may take a long time due to the large battery capacity. This is not a malfunction. For further information, refer to Operating Instructions. (An expected approximate recalibration time is displayed. When performing the battery recalibration without shutting down Windows, the recalibration time will be longer than shown.)
- If the computer is turned off during the battery recalibration (e.g., due to power failure, or accidental removal of the AC adaptor and battery pack), the battery recalibration will not be completed.- You can also perform the battery recalibration with the following procedure.- Connect an external keyboard to the computer.
- Restart the computer.
- Press and hold «F9» while the [Panasonic] boot screen is displayed just after the computer starts the startup procedure.
- When the remaining battery capacity is displayed, press «Enter».
- Follow the on-screen instructions.
Replacing the Battery Pack
If you have a battery charger (optional) or Cradle (optional), you can remove one battery pack to charge while the other battery pack is operating.
The battery pack is a consumable item so the replacement will be necessary. If the battery operation time becomes noticeably short and not recovered even after recalibrating the battery, replace with a new battery.
If one of the two battery packs has remaining power, you can replace the other battery pack without turning off the computer (Hot swap).CAUTION- The battery pack is not charged when you first purchase it. Be sure to charge it before using for the first time. Charging starts automatically when the AC adaptor is connected to the computer.- Use only the specified battery pack with your computer.- In sleep, do not remove/replace the battery pack. Otherwise your data will be lost and the computer may be damaged.Checking the battery pack that can be replaced/removed
Remove/replace the battery pack under the right conditions according to the chart below because if the computer is mistakenly shut down, this may cause data to be lost and the computer to malfunction.When the computer is ON or in sleep/Hibernation When the AC adaptor is not connected Only one battery pack can be removed/replaced.
To check if the battery pack can be removed/replaced:
When you open the battery cover, the blinking (red) of battery indicator tells.- When blinking approx. every 4 seconds: Can be replaced
- When blinking approx. every 0.5 second: Cannot be replaced
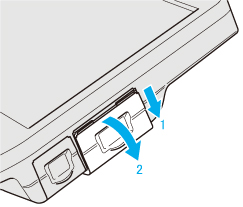
When the AC adaptor is connected Both battery packs can be removed/replaced. When the computer is OFF Both battery packs can be removed/replaced. - Open the battery cover.
- Slide the battery cover and open the cover.
- Open the cover.
- Check the blinking (red) status of battery indicator. (Battery Indicator)
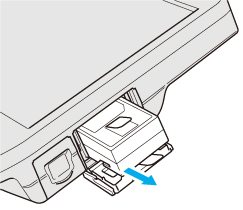
- Pull the tab to remove the battery pack.
- Insert the new battery pack until it securely fits the connector.

- Close the battery cover.
- Close the battery cover.
- Slide the battery cover until it clicks.

CAUTION- Make sure the battery cover is securely locked, otherwise the battery pack may fall when you carry the computer.- Do not remove the battery pack forcibly when the battery cover is locked. Doing so may damage the battery pack. - Click