<Only for
model with Fingerprint Reader>
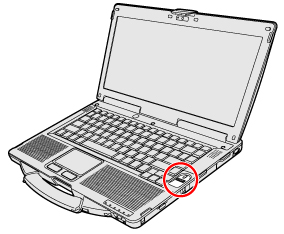
<CF-53 Series>
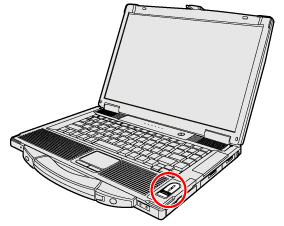
<CF-52 Series>
NOTE
- Enrollment and
authentication is unavailable to an extremely minority of people
including those whose fingerprints give little data for personal
identification.
How to
Use the Fingerprint Reader
This section explains how your fingerprints are enrolled and
authenticated.
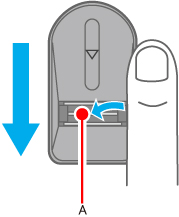
- Slide your finger toward yourself.
- To prevent a reading error.
- Set the first joint of your index finger on
the sensor as illustrated to the right.
- Slide your finger toward yourself while
keeping it in contact with the fingerprint sensor (A).
- Slide your finger down until the sensor is
visible.
- When the fingerprint sensor does not enroll or
authenticate your fingerprint properly:
- You slid your finger too fast or too slow.
- Your finger was soiled or it has a scar on
the surface.
- Your finger was wet or extremely dry.
- Your fingerprint does not have sufficient
data for personal identification.
For further information, refer to Troubleshooting-Fingerprint
Reader.
CAUTION
- We shall not be liable for
any loss or damage whatsoever resulting from your Fingerprint device or
neglect of Fingerprint device use, or any data loss resulting from such
developments as Fingerprint authentication device malfunctioning.
Overview
Fingerprint’s Outline
The conventional security systems use ID/passwords and token devices
such as IC cards to authenticate users. Therefore the passwords and
token devices are exposed to the risk of being lost, stolen and hacking.
The Fingerprint authentication method uses user’s
fingerprints instead of passwords for security authentication. You can
use your fingerprints to start up your computer and log on Windows.
We recommend you use the Fingerprint Reader in combination with the TPM
(Trusted Platform Module) to increase the security level of your
computer.
Recommended
Installation Procedure
(Performed
by the Computer Administrator)
- TPM Installation
(If the TPM is not being
used, skip this step.)
- Fingerprint Utility Installation
- TPM Fingerprint Utility Initialization
(If the TPM is not being
used, skip this step.)
(Performed by each
user)
- User Fingerprint Enrollment
User’s Data
- Windows Logon Password
- Fingerprint
- Fingerprint Backup Password
- Power-on Security
To access the online manual
This manual describes step 2, 3 and the initial part of step 4.
For further steps, refer to the Protector Suite Help menu.
- Click
 (Start)*1 - [All Programs] - [Protector Suite] -
[Control Center] - [Help] - [Help].
(Start)*1 - [All Programs] - [Protector Suite] -
[Control Center] - [Help] - [Help].
*1 : Windows XP: [start]
Precautions
Security Functions
- Fingerprint
Authentication Technology does not guarantee complete authentication
and individual identification. Please acknowledge we shall not be
liable for any loss or damage whatsoever resulting from the use of, or
inability to use your Fingerprint device.
- The Fingerprint authentication method uses multiple
fingerprints, encryption keys, credentials data and passwords. You
might not be able to use your data if you lose fingerprints, keys,
credentials and passwords. Back up the Fingerprint authentication data
in a safe place. For further information, refer to Backup.
- General interaction with third-party applications:
There is no guarantee that there will not be any negative interaction
with any third-party software, and will not accept any responsibility
for such an interaction.
Installation
- TPM Installation
Refer to the Installation
Manual of "Trusted Platform Module
(TPM)".
- Fingerprint Utility Installation
Performed by the Computer
Administrator.
- Log on to Windows as an Administrator.
- Close all other programs.
-
(For 32bit OS)
Click (Start), input
"c:\util\drivers\fngprint\install\32-bit\Setup.exe"
in [Search programs and files], and press «Enter».
(For 64bit OS)
Click (Start), input
"c:\util\drivers\fngprint\install\64-bit\Setup.exe"
in [Search programs and files], and press «Enter».
Click [start] - [Run] and input
"c:\util\drivers\fngprint\install\32-bit\Setup.exe",
and click [OK].
- Click [Next].
Installation starts.
Follow the on-screen instructions.
- When the "Protector Suite *.* has been
successfully installed." message appears, click [Finish].
At the confirmation
message, click [Yes].
The computer restarts.
- Log on to Windows as an Administrator.
The
"Fingerprint software Icon" 
appears in the notification area.
- If the icon does not appear, click
 . .
- TPM Fingerprint Utility Initialization
Performed by the Computer
Administrator.
The "Invalid TPM status" message is displayed by
the "Fingerprint software Icon"
in the notification area.
- If the icon does not appear,
click
NOTE
- If the
"Invalid TPM status" message is not displayed
- Click
(Start)*2 - [All Programs] - [Protector Suite] -
[Control Center] - [Settings] - [Advanced Settings] - [Trusted Platform
Module (TPM)] - [Initialize]. And then click
(Start)*2 - [All Programs] - [Protector Suite] -
[Control Center] - [Identity] - [Multifactor], and choose a method of
authentication.
- User Fingerprint Enrollment
Performed by each user.
- Double-click the "Fingerprint software
Icon" .
- Carefully read the License Agreement, and then
click [Accept].
- Select an enrollment mode, and click [Apply].
- Enrollment mode
You can make the configuration for the enrollment only once during this
initialization phase.
- Enrollment to the biometric device
All enrolled fingerprints are stored directly in the fingerprint
sensor. The user data will be secured by the hardware protection keys
obtained by the fingerprint sensor. This mode allows up to about 21
fingerprints to be enrolled.
- Enrollment to the hard disk
All enrolled fingerprints are stored on the hard disk. Hardware
protection of the user data is not possible, but multiple users can
enroll their fingerprints.
- Follow the on-screen instructions.
NOTE
- Enroll at least
two fingers. Even if one of them is injured, you can use another one to
access your account and secret data. For further information about the
enrollment, refer to How to Use
the Fingerprint
Reader and [Tutorial].
- Click
(Start)*2 - [All Programs] - [Protector Suite] -
[Control Center] - [Help] - [Tutorial].
- We
recommend you use the Power-on Security
feature. This feature prevents unauthorized access to the
user’s computer at the BIOS level.
- Click
(Start)*2 - [All Programs] - [Protector Suite] -
[Control Center].
- Click [Identity] - [Status].
- Click [Power-on security status] -
[Change].
- Click [Edit], and Add the check mark to
[Enable power-on security], and then click [Apply].
- Click [Identity] - [Power-on Password].
- When the "Power-on
Security" screen appears, click [Manage Passwords...].
- Select [Power-On] in [Password Types],
and click [Set password...].
- Enter the Power-On password, and click
[OK].
- Click [Close].
- Add a check mark for [Power-On] in
[Password Types].
- Enter the Power-On password, and click
[OK].
- Click [Apply].
*2 : Windows XP: [start]
More
Advanced Security
You can increase your computer’s security level by setting
the BIOS level described in this section.
Performed by the Computer Administrator.
- Register the Supervisor Password.
You have to register the
Supervisor Password to proceed to the next step.
If you have already registered the Supervisor Password, you can skip
this step, and move on to step 2.
If you have not done this, have enrolled your fingerprint using
Protector Suite, and have already made Power-on Security effective,
after step 2, your fingerprint authentication will be necessary.
- Turn on or restart the computer.
- Press «F2»
or «Del»
while [Panasonic] boot screen
is displayed soon after the computer starts the startup procedure.
- Select the [Security] menu.
- Select [Set Supervisor Password], and
press «Enter».
- Enter your password in the [Create New Password],
and press «Enter».
- The password will not be displayed on the
screen.
- You can use up to 32 alphanumeric characters
(including spaces).
- The case (upper/lower) is distinguished.
- Use only the upper horizontal row of numeric
keys to input your password.
- You cannot
use «Ctrl» to input a
password.
- Enter your password again in [Confirm New
Password], and press «Enter».
- Set the High Security Level.
- Select [Fingerprint Security], and
press «Enter».
- Select [Security mode], and select [High].
- Press «Esc» to close
the sub-menu.
- Press «F10», select
[Yes], and press «Enter» to
exit the Setup Utility.
NOTE
- In the [High] security
mode, you have to enter the Supervisor or User Password even after
fingerprint authentication.
In the [Simple] security mode, you do not have to enter the Supervisor
or User password after fingerprint authentication.
- To use the Power-on
Security feature, enable it in [Control
Center].
Do not use the fingerprint lists in the Setup Utility to change the
setting for [Power-on Security] except for the specific case such as
the fingerprint reader cannot be used.
Useful
Information
Backup
The file described below is necessary for recovering the Fingerprint
authentication data. Back up this file periodically in a safe location
such as removable disk to avoid data loss resulting from some
accidents. We recommend you to store the file in a removable disk or
network drive because the benefit of Fingerprint authentication
security can be reduced if you keep the file in the internal hard disk
drive.
The backup password described below is necessary for bypassing the
Fingerprint authentication. We recommend you set the backup password
using the [User Enrollment] wizard. If you do not define the backup
password, you may lose your data in case of authentication hardware
failure.
- File used by each user
- Backup user passport data
(Default name: <UserAccount>.vtp)
You need this file when you replace the embedded fingerprint chip, or
the hard disk drive, or when reinstalling Windows.
This file contains the fingerprints, encryption keys, and logon
authentication data.
NOTE
- How to Backup:
Select [Identity] in [Account
Operation] to save the user data.
- Click
(Start)*3 - [All Programs] - [Protector Suite] -
[Control Center] - [Identity] - [Account Operation].
For further information, refer
to the Protector Suite Help menu.
- Click
(Start)*3 - [All Programs] - [Protector Suite] -
[Control Center] - [Help] - [Help].
- Password used by each user
- Backup Password for Enrollment
This backup password can be used in case of hardware failure to bypass
the fingerprint authentication.
CAUTION
- The passwords other than
those explained above are also used for security, so do not lose them.
For further information, refer to the Protector Suite Help menu.
- Click
(Start)*3 - [All Programs] - [Protector Suite] -
[Control Center] - [Help] - [Help].
*3 : Windows XP: [start]
Limitations in Use
- Password Bank*4 limitations:
The following web pages cannot be supported.
Web pages which are created by the following technologies:
- Web forms created on the fly using javascript.
- Web forms which looks as one form (e.g. login
field, password field), but internally created with two independent
forms.
- There can be auto submit problems with web forms
which do not have Submit button. All forms that you cannot submit with
«Enter» will be entered by Password Bank, but not
submitted.
- Password Bank*4 limitations:
The following Windows applications cannot be supported.
- Applications which do not use standard Windows
controls and draw controls by their own.
- This includes any Java based application.
- "Sensor Scrolling Feature" is not
supported.
*4 : For further information, refer to the Protector Suite Help menu.
- Click
(Start)*5 - [All Programs] - [Protector Suite] -
[Control Center] - [Help] - [Help].
*5 : Windows XP: [start]
Handling &
Maintenance
- The enrolling and authentication sensitivity may
decline under the conditions below. Wipe off stains or moisture on the
sensor surface with a soft cloth.
- The surface of the fingerprint sensor is soiled
with dust, skin oil, or sweat.
- The surface of the fingerprint sensor is wet as a
result of moisture or condensation.
- Static electricity may also cause the sensor to
malfunction. To make your finger static-free, touch a metal surface
before placing it on the fingerprint sensor. Exercise caution against
static electricity in winter and other dry conditions.
- Malfunction or damage may occur when:
- The fingerprint sensor surface was damaged by the
strong rubbing of a solid material, scratches, or being pecked with a
pointed item.
- The sensor was touched with a finger soiled with
mud, damaging the sensor surface with a tiny substance, and staining
the surface.
- The sensor surface was covered with a seal, or
soiled with ink.
Deleting (Initializing)
Owner’s Data
When you dispose of the computer or transfer the ownership, delete
(initialize) the owner’s data to avoid unauthorized access.
NOTE
- The data enrolled in the
fingerprint sensor is not image data. You cannot restore fingerprint
image data from the data enrolled in the fingerprint sensor.
- Disable Power-on Security
- Log on to Windows as an Administrator.
- Click
(Start)*6 - [All Programs] - [Protector Suite] -
[Control Center].
- Click [Identity] - [Status] - [Power-on security
status].
- Click [Edit], and remove the check mark from
[Enable power-on security], and click [Apply].
- Click [Identity] - [Power-on Password].
- Click [Manage Passwords...].
- Select [Power-On] in [Password Types], and click
[Unset password...].
- Enter the Power-On password, and click [OK].
- Click [Close].
- Confirm that fingerprint data is not
registered.
- Delete Fingerprint Data.
Performed by each user.
- Click
(Start)*6 - [All Programs] - [Protector Suite] -
[Control Center].
- Click [Identity] - [Account Operation].
- Click [Delete user data].
- At the confirmation message, click [Yes].
- Enter Windows log on password then, click
[Submit].
- Confirm that there is no item in [Password
Types].
- Uninstall
Protector Suite
Performed by the Computer
Administrator.
- Log on to Windows as an Administrator.
- Close all programs.
- Click
(Start)*6 - [Control Panel] - [Uninstall a
program].
- Double-click [Protector Suite *.*], and select
[Remove].
- Select [Remove all Protector Suite *.* data], and
click [Next].
- Uninstallation starts. Follow the on-screen
instructions.
- When the "Protector Suite *.* has been
successfully uninstalled." Message appears, click [Finish].
- If the confirmation message appears, click
[Yes].
- The computer restarts.
*6 : Windows XP: [start]
Starting
Over
If the specific solutions for your problem in Troubleshooting-Fingerprint
Reader
do not
work, you can use these instructions as the last measure and start
over. However, please note that you can lose your data - passwords,
secret keys and fingerprints.
- Log on to Windows as an Administrator.
- You can always access the computer by using your
Windows log on password.
- Try to export your passport to a file if you are
planning to use your passwords, secret keys or enrolled fingers in the
future.
- If you exported your passport recently, this step
is not required.
- If biometrics authorization works and your finger
is recognized, use [Account Operation] wizard, swipe your finger and
continue according to wizard’s instructions.
- If biometrics authorization works, but your
finger is not recognized, you can start the [Account Operation] wizard
and export the passport even without using your fingerprint. You need
to cancel fingerprint dialog, and you will be prompted for a password.
If you do not use backup password, enter your Windows log on password.
Otherwise, enter your backup password.
CAUTION
- We recommend you set the
backup password.
- If biometrics authorization does not work, there is
no way to backup your data.
- Deleting the passport.
- Use the [Delete your data] wizard. Please note
that all your stored secret data (passwords, [File Safe] encryption
keys [Personal Safe] data) will be lost. If you backed up the data, you
can restore it in the next step; otherwise it will be lost permanently.
To perform the delete operation it is necessary to cancel the
fingerprint verification operation to get to the password dialog, then
enter your Windows log on password or backup password.
- Make sure your fingerprint sensor is working.
- Use the Tutorial wizard to verify that the
fingerprint sensor works. If not, reboot and try again. If it still
does not work, please contact Panasonic Technical Support.
- Restore or create passport.
- If you have a backup of your data, you can now
use [Account Operation] wizard to restore your data. Otherwise you can
create a new passport by using the [Manage Fingerprints] wizard.
|