Barcode Reader |
|
<Only for model with Barcode Reader>
CAUTION
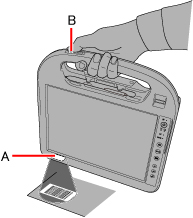
- Do not look directly into the reading window.
DO NOT LOOK DIRECTLY AT THE LED LIGHT.
Reading Barcodes
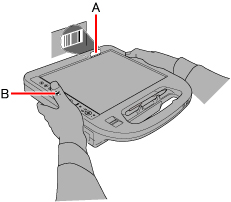
To prevent unintended operationIf you press the Barcode Reader button on the handle accidentally, the computer may operate in a manner that you do not intend.
You can set the Barcode Reader buttons so that they do not function.
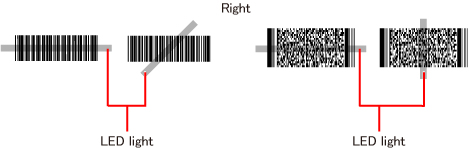
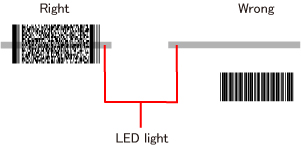
Select [Disabled] in [Handle Button] of the [Main] menu of the Setup Utility. To Correctly Read a Barcode with This Computer, Observe the Following
Selecting Software Mode or Hardware ModeThis computer supports two barcode reading modes; software mode and hardware mode.
If you are using an application program that has its own barcode reading function, set the computer to hardware mode. If your application program does not have a barcode reading function, set the computer to software mode, as this allows the application program to use the computer’s barcode reading function. To switch the modes
If the computer is set to undesired modeIf you execute [Load Default Values] and then [Save Values and Reboot] in the [Exit] menu of the Setup Utility, for example, the computer may be set to a mode that does not match your usage environment.
In this case, one of the following messages appears.
NOTE
- If you click [No] in step 1, [The barcode reader setting and the setup utility setting are inconsistent.
The barcode reader might not work correctly.
Please confirm the setup utility setting.] appears.
Restart the computer and set the computer to the desired mode.
- If the computer fails to change the setting, [Barcode setting failed.
Please end the barcode-related application and then retry.] appears.
Exit the running barcode-related application program, and click [Retry]. If the problem still persists, restart the computer. - If [Initialization failed.] appears, restart the computer.
Cleaning the Reading WindowIf the reading window is dirty, gently wipe the reading window with a cloth or a cotton swab moistened with water.
Do not allow materials that can easily scratch the reading window to touch the window, such as sandpaper or metal object. For parts other than the reading window, please read “Handling and Maintenance” in the OPERATING INSTRUCTIONS.
<Only for model with 2D Barcode Reader>
Decode Capabilities
Following codes are supported as the factory default.
Codabar, Code39, Code128/GS1-128, DataMatrix, I2of 5, PDF417, QR Code, GS1 Databar, UPC/EAN
Following codes also can be used by specifying them with Barcode Configuration Utility.
Aztec, Code11, Code93, GS1Composite, Maxicode, MSI Code, MicroPDF417, Plessey Code, Telepen, TLC39
Barcode Configuration Utility
Using the Barcode Configuration Utility, you can create and perform the configuration files to set up the settings for Barcode Reader module and MCA configuration.
Installing the Utility
Two Utilities have been prepared to set the Barcode Reader operations.
Installing Barcode Configuration Utility
Installing Barcode Setting Utility
Using Barcode Configuration Utility
Usually choose the “CF-H2 Series (2D Barcode Reader)”and “With MCA Mode”.
[Barcode Configuration Utility] screen appears. NOTE
- If an error message appears and nothing is displayed, restart this utility.
- When the computer has resumed from sleep and hibernation, an error may appear and the connection with this utility may be lost.
If this occurs, restart this utility.
- A standard user needs to enter an administrator password.
Applying settings
To apply the settings for the Barcode Configuration Utility, follow the steps below.
NOTE
- Alternatively you can reflect the setting contents to the Barcode module in the following procedures.
Click
x:\xxxxxxxx\xxxxxxxx.ini*2] in [Search Programs and files], and press «Enter». A standard user needs to enter an administrator password.
*1 : (64-bit) :Program Files (x86)
*2 : Drive name, folder name and file name for configuration file. - After applying, the settings occur either in the Barcode module or the Barcode Key Emulator.
You do not need to operate the Barcode Setting Utility every time when you restart the computer.
Data configuration
You can change the settings by adding check marks for items.
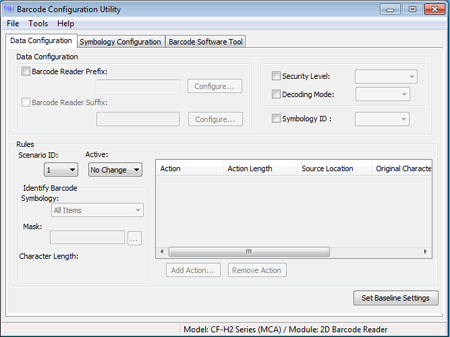 NOTE
- If the input column is left blank, or the number of characters entered exceeds the maximum limit in the [Add Action] setting, an error message appears.
In this case, click [OK] to close the menu and make the setting again.
Or, click [Cancel] and close the [Add Action] screen.
- To change the Action already registered, delete Action for [Remove Action] and then register again for [Add Action].
Symbology Configuration
Various settings can be made for each barcode type that can be read.
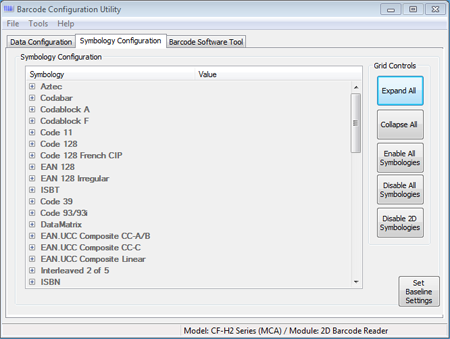 NOTE
- CODE128 and ISBT, or EAN128 and ISBT cannot be Enabled/Disabled at the same time.
- For some items, the setting cannot be changed.
Grid controls
You can select options for the symbology and value.
NOTE
- [Disable 2D Symbologies] is displayed only for 2D Barcode Reader.
Barcode Software Tool
Barcode Software Tool is for MCA Configuration.
You can change the settings by adding check marks for items. 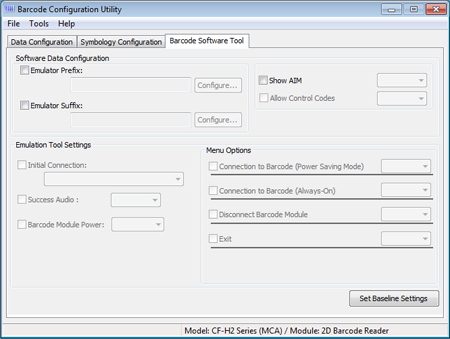 |