|
You can switch the output
destination to an external analog display or HDMI display.
First push down and pull the cover to open the cover.
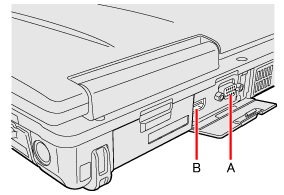
<CF-53 Series>
Connect the analog display to the VGA port (A).
Connect the HDMI display to the HDMI port (B).
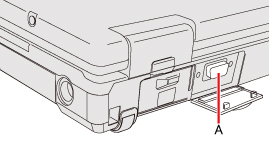
<CF-52 Series>
Connect the analog display to the External Display port (A).
Switching
the display mode

- Press «
 »
+ «P»
or «Fn»
+ «F3». »
+ «P»
or «Fn»
+ «F3».
- Click the display mode.

- Press «Fn»
+ «F3».
Each time you press the
key combination:
<CF-53
Series>
LCD → LCD + HDMI display (port replicator side)*1
→ HDMI display (port replicator side)*1
→ LCD + HDMI display (computer side) → HDMI display
(computer
side) → LCD + analog display → analog display
→ HDMI
display (computer side) + analog display → LCD
<CF-52
Series>
Internal LCD → Simultaneous display
→ External display
→ Internal LCD *1 : Only when a port
replicator having an HDMI port is connected.
NOTE -
<Only for CF-52 Series>
When an external display is connected to an optional port replicator
(CF-VEB522), the display switching may work differently from the above.
For further information, refer to the instruction manual of the port
replicator. - After resuming from sleep*2
or hibernation, or restarting the computer, the output destination may
not be the same as selected in the previous status.
- When you change the
display after Windows starts up, do not press any key until switching
is complete.
- You cannot use the
simultaneous display until Windows starts up.
- Display switching by
pressing « »
+ «P» *3
or «Fn»
+ «F3» may not work when you use the Fast
User Switching function to
switch the user. In this case, log off all users and restart the
computer. - Do not connect or remove
the external display during sleep*2 or
hibernation.
- It may take some time to
switch between displays depending on the displays used. - When you use the external
display only, set the suitable number of colors, resolution, or refresh
rate separately from when you use the internal LCD only or when you use
the simultaneous display.
Depending on the settings, some external displays may be distorted or
may not display the mouse cursor correctly. In this case, set the
settings to lower value.
- When you use the
simultaneous display, DVD-Video, MPEG files and other motion image
files may not be played back smoothly.
- Carefully read the
instruction manual of the external display.
- When connecting an
external display that does not conform to the Plug & Play
standards, select the display driver accordingly in the following menu,
or use the driver disc supplied with the monitor.
- Click
 (Start) - [Control Panel] - [Adjust screen resolution] - [Advanced
Settings] - [Monitor] - [Properties].
(Start) - [Control Panel] - [Adjust screen resolution] - [Advanced
Settings] - [Monitor] - [Properties].
- A standard user needs to enter an administrator
password.
- Click [Driver] - [Update Driver].
- Click [start] - [Control Panel] - [Appearance and
Themes] - [Display] - [Settings] - [Advanced] - [Monitor] -
[Properties] - [Driver] - [Update Driver].
- If you connect an external
display via the port replicator (For CF-53 Series: CF-VEB531/For CF-52 Series: CF-VEB522), the output switches to the
port replicator from the external display port.
- <Only for CF-53 Series>
Until Windows startup is
completed (during Setup Utility, etc.), the simultaneous display cannot
be used and pressing «Fn»
+ «F3»
switches the display between the
internal LCD and the external display (the projector etc.). - <Only for CF-53 Series> When you use high
resolution displays, the display color, resolution or refresh rate may
be changed, switching to [Built-in Display] in [Intel ®
Graphics and Media Control Panel].
We recommend you to switch the output destination by
pressing « »
+ «P» *3
or «Fn»
+ «F3». - Simultaneous display and
display switching do not work when [Command Prompt] screen is set to
"Full Screen".
- If a picture is not
displayed normally, lower the level of [Hardware acceleration] in the
following menu.
[Start] - [Control Panel] - [Appearance and Themes] - [Display] -
[Settings] - [Advanced] - [Troubleshoot]
CAUTION
- Before disconnecting the
external display, switch to the internal LCD by
pressing « »
+ «P» *3
or «Fn»
+ «F3». Otherwise the displayed
image quality may become different after disconnection (e.g., wrong
resolution). In this case, press « »
+ «P» *3 or
«Fn» + «F3» to reset the image
quality. - The screen may become
distorted due to the following operations. In this case, restart the
computer.
- Disconnecting an external display for which you have
set high resolution or high refresh rate.
- Connecting/disconnecting an external display during
computer operations.
*2 : Windows XP: standby
*3 : Windows 7 only
Display
Selector <Only for CF-53 Series>
You can connect up to four
external displays when using a port replicator.
When an external display is connected, you can use the simultaneous
display function and the extended desktop function. The extended desktop
function allows you to use the working area across
both the internal LCD and the external display. You can drag an object
around the displays.
The
Display Selector utility allows you to easily activate/deactivate the
simultaneous display function and the extended desktop function.
It also allows you to set the scaling rate of an external HDMI display.
- Click (Start)*4
- [All Programs] - [Panasonic] - [Display Selector].
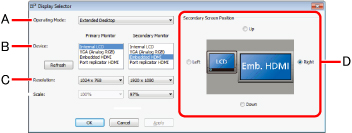
- Make the required settings.
A: [Operating
Mode]
Select [Single Display] to
activate only one
display.
Select [Extended Desktop] to activate the extended desktop function.
Select [Clone Displays] to activate two displays.
After making a selection, click [Apply]. The following settings can
then be made.
B: [Device]
When
[Extended Display] or [Clone Displays] is selected in [Operating Mode],
select the displays to be used as the primary device and the secondary
device.
When [Single Display] is selected, you can select only the primary
device.
C: [Resolution]
Select the resolution of
the display.
When
[Extended Desktop] is selected in [Operating Mode], the resolution can
be selected for the primary device and the secondary device
independently. D: [Secondary
Screen Position]
When
[Extended Desktop] is selected in [Operating Mode], specify the
position of the secondary monitor by selecting [Up], [Down], [Left] or
[Right].
The display image with the black frame and the taskbar
indicates the primary device, and the other indicates the secondary
device.
- Click [Apply] to enable the settings.
- Click [OK].
*4 : Windows XP: [start]
NOTE
- It may not be possible to
use the extended desktop
with some software applications.
- When using the extended
desktop, if you click the
maximize button, the window is displayed on one of the displays.
You cannot move the maximized window to the other display.
- When
both an analog display and an HDMI display are connected, and if you
select [Extended Desktop] or [Clone Displays],three output destinations
(internal LCD, external analog display, and external HDMI display) can
be selectable at both primary device and secondary device. In this
case, the external analog monitor is referred to as "PC
monitor" and the HDMI display is referred to as
"Digital Television".
- <Only for model
with touchscreen>
Set
the internal LCD to the primary device when using the touchscreen. The
cursor will move on the primary device when you touch the internal LCD.
Changing
the Sound Output Destination
When
an HDMI display is connected, you can specify sound to be output via
the speakers of the personal computer or via the speakers of the HDMI
display.
Make sure your HDMI display is equipped with speakers.
- Click
(Start) - [Control Panel] - [Hardware and Sound] - [Sound] - [Playback].
- Select the sound output destination.
- Click [Set Default], and then click [OK].
- Click [start] - [Control Panel] - [Sound, Speech, and
Audio Devices] - [Audio].
- Select the sound output destination in [Default
Device].
- Click [OK].
|