|
NOTE
- Connect the AC adaptor if
writing operation takes a long time. If the remaining battery power
becomes low and the power is not supplied, writing operation may not be
completed.
- You need to use writing
software to write to discs (e.g. Using Roxio
Creator
LJB).
Ensure the disc is compatible with the selected writing speed.

You can also use Windows features to write to discs (  Using Windows
Feature Using Windows
Feature).
- The quality of written
data depends on the disc.
Handling
Precautions
CD/DVD drive
handling care
- Do not expose the CD/DVD drive to excessive smoke
that may leave a residue, e.g., oil smoke, or tobacco smoke. Doing so
can shorten the life of the drive lens.
- We recommend cleaning the drive lens with an air
puffer used for camera lenses.
(Do not use any spray-type of lens cleaning products.)
When
opening/closing the tray
- When the computer is on, use the eject button
(Inserting/Removing
a Disc)
or
eject through Windows.
- When inserting or removing a disc, be careful not to
touch the lens and other parts of the laser pickup.
- Do not leave the tray open and do not touch the lens.
The lens and disc can become dusty in some conditions. It may cause
malfunction in reading or writing.
- Do not apply excessive force to the tray in the open
position.
- Never insert a foreign object such as a paper clip
into the CD/DVD drive.
Doing so may cause malfunction.
- Do not place items other than discs on the tray.
- Do not access the drive until after the tray is
closed.
- Set this computer on a horizontal plane.
While the CD/DVD
drive is being accessed
- Do not open the CD/DVD drive or move the computer
while the CD/DVD drive is being accessed.
Doing so could cause the disc to shift position and this may damage the
disc, or cause the CD/DVD drive to malfunction.
In addition, after running an application involving access to a disc,
close the application before opening the CD/DVD drive.
- Set this computer on a horizontal plane.
Disc
handling care
- Do not use deformed, warped, or irregularly shaped
discs.
Reading of disc may not be possible depending on the disc conditions
(cracks, dirt, modification, data recording quality, copy protection,
recording equipment/software that was used to create the disc, etc.)
- Before using a disc, carefully read the
operating/handling instructions and package of the disc.
- If the discs are not handled appropriately, they may
become dirty or scratched. Furthermore the writing speed may get slower
and the data may not be correctly written on or read from the disc.
Other damage may cause a drive failure.
- Note the following precautions.
- Do not touch the disc surface (the side with no
printing).
- Keep the disc surface clean and free from dirt,
dust, fingerprints and scratches.
- Do not write on the surface of the disc with a
ballpoint pen or other writing instrument.
- Do not attach stickers to discs.
- Do not drop, bend, or place heavy objects on top
of discs.
- Do not place or store discs in locations exposed
to heat, direct sunlight, humidity or dust.
- If a disc is brought from a cold to a warm
location, condensation may form on the disc. For read-only discs, wipe
off the condensation using a soft, dry, lint-free cloth before using
the disc. For recordable/rewritable discs, wait until the condensation
dries.
- When not using discs, keep them in their
protective cases or cartridges.
To clean discs
<For read-only discs>
Wipe discs with a dry, soft cloth from the center toward the edge.
If discs get very dirty, wipe with a moist, soft cloth from the center
toward the edge, then wipe again with a dry cloth to take up remaining
moisture.
<For recordable/rewritable discs>
Use the disc for recordable/rewritable discs cleaner to clean these
discs.
Do not use a cloth, CD cleaners or any other such cleaners under any
circumstances.
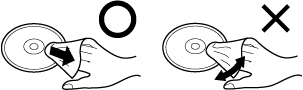
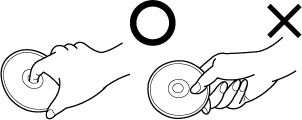
How to hold a disc
Disc
Information
- You can read from/write to the following discs.
| CD-R |
CD-RW |
 |
 |
| DVD-RAM*1 |
DVD-R |
DVD-R DL |
DVD-RW*2 |
 |
 |
 |
 |
*1 : DVD-RAM: Only
non-cartridge type or removable cartridge type can
be used.
*2 : Does not support DVD-RW Ver.1.0.
- You can read from the following discs.
| CD-ROM |
CD DIGITAL
AUDIO |
CD TEXT |
 |
 |
 |
| CD-EXTRA |
Video CD |
Photo CD |
  |
 |
 |
| DVD-ROM |
DVD-Video |
 |
 |
Recommended discs for writing
- CD-R
- TAIYO YUDEN Co., Ltd.
- CD-RW/High-Speed CD-RW
- MITSUBISHI KAGAKU MEDIA CO., Ltd.
- Ultra-Speed CD-RW
- MITSUBISHI KAGAKU MEDIA CO., Ltd.
- DVD-R
- Panasonic Corporation
MITSUBISHI KAGAKU MEDIA CO., Ltd.
TAIYO YUDEN Co., Ltd.
- DVD-R DL
- MITSUBISHI KAGAKU MEDIA CO., Ltd.
TAIYO YUDEN Co., Ltd. - DVD-RW
- MITSUBISHI KAGAKU MEDIA CO., Ltd.
Victor Company of Japan, Limited
- DVD-RAM
- Panasonic Corporation
HITACHI MAXELL, Ltd.
- +R / +RW
- MITSUBISHI KAGAKU MEDIA CO., Ltd.
- High Speed +RW
- MITSUBISHI KAGAKU MEDIA CO., Ltd.
- +R DL
- MITSUBISHI KAGAKU MEDIA CO., Ltd.
DVD discs you can use for writing
- DVD-R for General
- 1X-SPEED (4.7 GB)
1-2X-SPEED (4.7 GB)
1-4X-SPEED (4.7 GB)
1-8X-SPEED (4.7 GB)
1-16X-SPEED (4.7 GB)
- DVD-R DL
- 2-4X-SPEED (8.5 GB)
2-8X-SPEED (8.5 GB)
- DVD-RW
- 1X-SPEED (4.7 GB/9.4 GB)
1-2X-SPEED (4.7 GB/9.4 GB)
2-4X-SPEED (4.7 GB/9.4 GB)
2-6X-SPEED (4.7 GB/9.4 GB)
- DVD-RAM
- 2X-SPEED (4.7 GB/9.4 GB)
2-3X-SPEED (4.7 GB/9.4 GB)
2-5X-SPEED (4.7 GB/9.4 GB)
- +R
- 1-2.4X-SPEED (4.7 GB)
1-4X-SPEED (4.7 GB)
1-8X-SPEED (4.7 GB)
1-16X-SPEED (4.7 GB)
- +R DL
- 2.4X-SPEED (8.5 GB)
2.4-8X-SPEED (8.5 GB)
- +RW
- 1-2.4X-SPEED (4.7 GB)
1-4X-SPEED (4.7 GB)
- High-Speed +RW
- 3.3-8X-SPEED (4.7 GB)
Using DVD Media
To play DVD-Video, you need to use DVD playback software
such as WinDVD.
Region code setting
DVD-Video is allocated to region codes according to where they are
sold. To play the DVD-Video, the player’s software and the
drive must have the corresponding region code.
e.g., For U.S.A. and Canada:
"1" / For Europe: "2"
- The region code of the drive is not set at purchase.
The operation depends on the DVD-Video that is first played.
- DVD-Video with a specific region code:
The drive will automatically be set at the same region code as the
DVD-Video.
- DVD-Video with multiple region codes:
[Confirm Region] appears. Select the region code and click [OK]. Play
now begins.
CAUTION
- You can change the region
code setting up to 5 times including the initial setting. Be extremely
careful because you cannot change the region code anymore after the
fifth change, even if you reinstalled the operating system.
- Any problem resulting from
illegal changing or altering of the region code is the user’s
responsibility.
NOTE
- [Confirm Region] appears
when the DVD-Video has only 1 region code and the drive is set for
another region code.
([Confirm Region] may not appear with some DVD-Video discs. To check
the current region code and the number of remaining times of changing
the code, right-click on the WinDVD screen and click [Setup] -
[Region].)
Inserting/Removing
a Disc
- Turn on the computer.
- Press the eject button (A) and slowly pull out the
tray.
<CF-53 Series>
<CF-52 Series>
- Insert/Remove a disc.
- To insert
Set the disc with the label side up and press the center of the disc
until it clicks in place.
- To remove
Press on the center spindle (B) and carefully lift up the edge of the
disc.
- Close the tray.
Do not press the eject
button.
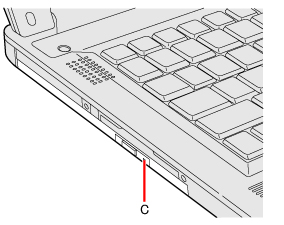
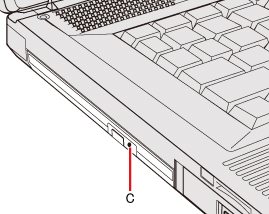
NOTE
- To remove a disc when the
computer is powered off, insert a pin of 1.3 mm {0.05± in diameterr
into the emergency hole (C). (When the diameter of the pin is smaller
than this, insert the pin slightly downward.) Pushing it to the end
allows the tray to come out.
<CF-53 Series>
<CF-52 Series>
- For AutoPlay CD/DVD:
- If an AutoPlay CD/DVD does not start after the
computer resumes from sleep*3 or hibernation,
remove the disc from the drive and then reinsert it after waiting 15
seconds.
- An AutoPlay CD/DVD may start during file access
depending on the status of the disc.
- When playing back motion
video from a disc, playback may not be smooth in some conditions.
*3 : Windows XP: standby
Power-saving mode
If the CD/DVD drive is not accessed for 30 seconds, the drive motor
will automatically be shut down to reduce the power consumption. When
the CD/DVD drive is accessed again, the drive motor is turned on. In
this case, reading of the disc data will take approximately 30 seconds.
Changing
the CD/DVD Drive Letter
You can change the drive letters for the CD/DVD drive.
NOTE
- Change the drive letters
before installing applications.
Click  (Start) - [Control Panel] - [System and
Security] - [Administrative Tools], and double-click [Computer
Management].
(Start) - [Control Panel] - [System and
Security] - [Administrative Tools], and double-click [Computer
Management].
- A standard user needs to enter an administrator
password.

Click [start] - [Control Panel] - [Performance and Maintenance] -
[Administrative Tools], and double-click [Computer Management].
- Click [Disk Management] from [Storage].
- Right-click the hard disk partition or the CD/DVD
drive name, and click [Change Drive Letter and Paths...].
- Click [Change...].
- Click [Assign the following drive letter] and select
the new drive letter, and then click [OK].
At the confirmation message, click [Yes].
|